
THE BASICS
Like almost everything else about growing excellent Cannabis, germinating your seeds successfully is pretty simple. We’ve used this very basic, inexpensive method for many years and have shared it among thousands of growers worldwide who have all had excellent results with no issues.
First make a mix in the ratio of 1/3 3% hydrogen peroxide to 2/3 distilled water.
It’s important to use only distilled water - some of the common chemicals in tap water can stunt, warp or kill your plant even well past seedling stage when you’ve already spent weeks tending it.
Then soak your seeds in the distilled water/hydrogen peroxide mixture overnight. If you’re growing multiple varieties, be sure to soak them separately. (Don’t laugh. It’s happened.)

Next, pour some of the soak water onto really absorbent paper towels, then wring or squeeze them out lightly and lay them flat. We use 2-3 towels layered together to make a nice thick absorbent nest.
The best seeds often sink and compromised seeds sometimes float, but there are always exceptions to the rule.

Then sprinkle the soaked seeds, using a clean spoon or gloved fingers, onto the moist paper towels, not crowding the seeds.

Then fold the moistened towels over the seeds to make a flat little package.
If you’re sprouting more than 12 seeds at a time, make more than one package - don’t crowd them.
Then put the moist towel and seeds flat inside a closed, unzipped storage-size plastic baggie, laying it flat somewhere away from direct light at room temperature.
In two or three days the seeds will sprout - maybe not all at once, but that’s not a problem because within 24 hours of the first seed sprouting all the others will have sprouted too. Keep your inspection peeks short as not to dehydrate the paper towel.

When the seeds each have a 3/4” root and the halves of the shell are beginning to open noticeably, meaning the embryo leaves are swelling inside, they’re ready.
You then want to move each sprouted seed into a Jiffy Cube you’ve prepared by making a small hole using a pencil or chopstick. Again - be sure you used distilled water to hydrate your Jiffy Cubes and of course use it everywhere else during germination.
Replanted into Jiffys:

Using your fingers, pick up the seed very gently by its shell, and avoid touching the sprouting root as you transfer it into the jiffy cube.
Also remember what’s unfolding inside that little shell as you handle it, be super delicate and stay conscious of the life emerging inside.
Now place the sprouting seed root-down in the hole letting it settle in naturally with the top of the seed even with the top of the hole - never push it down.
If it doesn’t nest right in, lift it out and poke the hole a little deeper. The cells at the tip of that little root hold the most miraculous ecosystem of emerging life one can imagine and while they are incredibly tough in nature they are also vulnerable to our mis-handling.
Now all you have to do is let the new sprouts do the thing they do so well.
Within a day or so they will raise up their first leaves.
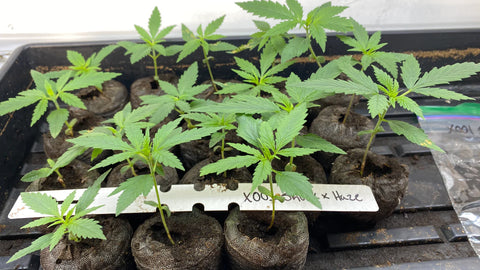
In a couple of days when they’ve developed their first set of true leaves, not the embryo leaves, it’s time to put them into larger pots with living soil and a mild fertilizer and then let the plants fully establish themselves.
3 Days Later:

10 Days Later:
